How to install Nutanix CE into ESXi 6.0
Nutanix announce a CE edition and could download from The newest version is ce-2015.06.08-beta.img.gz. If you want install it into ESXi 6.0 , please use this version. So what we need to prepare ? Please reference here Joep wrote for install on the Fusion. Website is here
http://www.virtuallifestyle.nl/2015/06/nextconf-running-nutanix-community-edition-nested-on-fusion/
But I found some tips we need to know when we installed into ESXi. My idea is put three nodes into one ESXi server. My X86 Server with 32 GB RAM, 480 SSD and 2 TB Seagate HDD. Let's start installing Nutanix CE into ESXi 6.0
1. ESXi 6.0 Installed - I think I will skip how to install the ESXi 6.0 and vCenter 6.0, you can find many documents talking about how to install VMware software .
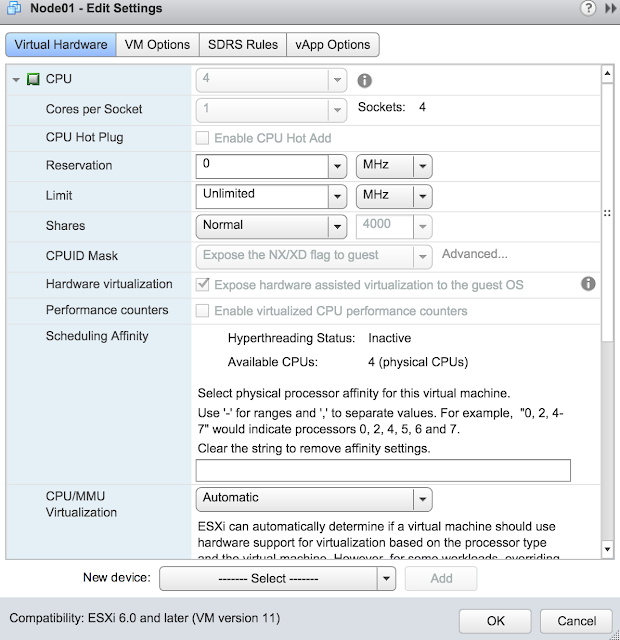
2. Create VM - From the beginning , I thought in a nest environment . So I choose the VM type as ESXi6 . But I got kernel panic when I tried to install Nutanix CE. Then suddenly I think Nutanix original base is linux base, so I choose Centos4/5/6 as my VM OS type . Then the kernel panic issue gone. At least 4 vCPU and 16 GB RAM.
Please also click on "Hardware Virtualization"

3. Create All VMDK for nest
Nutanix CE used - We need create at least 200 GB SSD, and 500 GB HDD for this VM. If you have enough space to use. You can use thick/eager zeroed thick vmdk format. If you don't have such space , you just use thin format . We also need to attach the Nutanix installation gz file. Untar ce-2015.06.08-beta.img.gz , and you will get a ce-2015.06.08-beta.img file around 7.5 GB rename is as "ce-flat.vmdk. Please also download the ce.vmdk from Joep site. Please those two files in same folder.
4. Start install - Boot up this VM , and you will see the login prompt . "Do not type install first" , just login using root / nutanix/4u jogin as root permission . You need to modified some files. If you do not edit those files , you always get some errors. we need to change some installation check files. Those files are .
4a. go to /home/install/phx_iso/phoenix find one file called minimum_reqs.py , using vi open and edit it. Find the words like
-->
checkVtd(dmesg)
checkSSD()
checkDiskModels(param_list)
checkInstallationDiskSize(param_list)
Change into
-->
checkVtd(dmesg)
#checkSSD()
checkDiskModels(param_list)
checkInstallationDiskSize(param_list)
SSD_rdIOPS_thresh = 50
SSD_wrIOPS_thresh = 50
logout , and you will get login prompt again . type "install" . The installation took you about 5-10 minutes to complete .
5. Change your network setting in ESXi - Please change your vswitch setting , go security and make Promiscuous mode = Accept . Otherwise your CVM can't ping each other .
6. Create your cluster - I suggest using commend line to create cluster will be easier for you . And all the step you need to do. I found I need to setup all the steps and make Nutanix CE normal .
nutanix@cvm$ cluster -s cvm_ip_addrs1, cvm_ip_addrs2, cvm_ipaddrs3 create
nutanix@cvm$ cluster start
nutanix@cvm$ ncli cluster edit-params new-name=cluster_name
nutanix@cvm$ ncli cluster add-to-name-servers servers="dns_server"
nutanix@cvm$ ncli cluster get-name-servers Configure the NTP servers.
nutanix@cvm$ ncli cluster add-to-ntp-servers servers="ntp_server"
nutanix@cvm$ ncli cluster set-external-ip-address
After that you could see you have three nodes running in one ESXi Server . Just like this .
and each node almost take 7 GB RAM , and total need is 21 GB around. See the picture , why I more than 24 GB, because I have one vCenter take 8 GB..
Any comments please let me know ..
Albert


3 則留言:
請教
你覺得 nutanix 好玩嗎?
很不錯啊,你可以下載試試...
我正打算要買部 Lenovo W520 來安裝 Nutanix CE.
所以在網路上找到你這篇文章,請問你現在在美國嗎?
你是程序員嗎?
張貼留言